- 您现在的位置:买卖IC网 > Sheet目录19096 > CUB7P310 (Red Lion Controls)COUNTER 8-DIGIT LV GRN BACKLIGHT
�� �
�
�1.0� I� NSTALLING�
�THE�
�M� ETER�
�INSTALLATION� ENVIRONMENT�
�The� unit� should� be� installed� in� a� location� that� does� not� exceed� the� maximum�
�operating� temperature� and� provides� good� air� circulation.� Placing� the� unit� near�
�devices� that� generate� excessive� heat� should� be� avoided.�
�The� bezel� should� be� cleaned� only� with� a� soft� cloth� and� neutral� soap� product.�
�Do� NOT� use� solvents.�
�Continuous� exposure� to� direct� sunlight� may� accelerate� the� aging� process� of�
�the� bezel.� Do� not� use� tools� of� any� kind� (screwdrivers,� pens,� pencils,� etc.)� to�
�operate� the� keypad� of� the� unit.�
�Installation�
�The� CUB7� series� of� products� meets� NEMA� 4X/IP65� requirements� for�
�outdoor� use,� when� properly� installed.� The� units� are� intended� to� be� mounted� into�
�an� enclosed� panel.� The� viewing� window� and� reset� button� are� factory� sealed� for�
�a� washdown� environment.� A� sponge� rubber� gasket� and� mounting� clip� are�
�provided� for� installing� the� unit� in� the� panel� cut-out.�
�The� following� procedure� assures� proper� installation:�
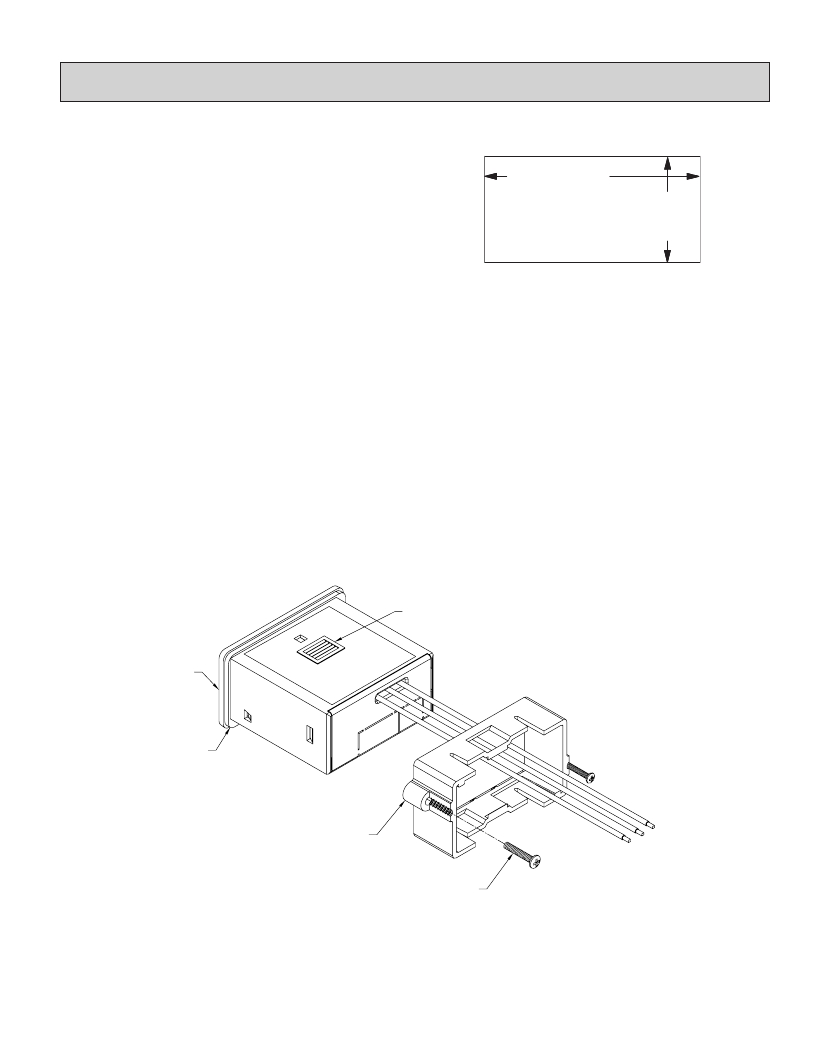
�-0.000�
�-0.0�
�1.77� +0.024�
�(45� +0.6� )�
�-0.000�
�-0.0�
�0.88� +0.012�
�(22.2� +0.3� )�
�1.� Cut� panel� opening� to� specified� dimensions.� Remove� burrs� and� clean� around�
�panel� opening.�
�2.� Carefully� remove� and� discard� the� center� section� of� the� gasket.� Slide� the� panel�
�gasket� over� the� rear� of� the� unit� to� the� back� of� the� bezel.� Insert� the� mounting�
�screws� onto� both� sides� of� mounting� clip.� The� tip� of� the� screw� should� NOT�
�project� from� the� hole� in� the� mounting� clip.�
�3.� Install� the� CUB7� unit� through� the� panel� cut-out� until� the� front� bezel� flange�
�contacts� the� panel.�
�4.� Slide� the� mounting� clip� over� the� rear� of� the� unit� until� the� clip� is� against� the�
�back� of� the� panel.� The� mounting� clip� has� latching� features� which� engage� into�
�mating� features� on� the� CUB7� housing.�
�Note:� It� is� necessary� to� hold� the� unit� in� place� when� sliding� mounting� clip� into�
�position.�
�5.� Alternately� tighten� each� screw� to� ensure� uniform� gasket� pressure.� Visually�
�inspect� the� front� panel� gasket.� The� gasket� should� be� compressed� to� about� 75�
�to� 80%� of� its� original� thickness.� If� not,� gradually� turn� mounting� screws� to�
�further� compress� gasket.�
�6.� If� gasket� is� not� adequately� compressed� and� the� mounting� screws� can� no� longer�
�be� turned,� loosen� mounting� screws,� and� check� that� mounting� clip� is� latched�
�as� close� as� possible� to� the� panel.�
�7.� Repeat� from� step� #5� for� tightening� mounting� screws.�
�Latching� Feature�
�Bezel�
�Gasket�
�Mounting�
�Clip�
�Mounting�
�Screw�
�3�
�发布紧急采购,3分钟左右您将得到回复。
相关PDF资料
5330H5-5V
LED T1-3/4 GREEN 562NM VAR HT
5330H1-5V
LED T1-3/4 RED 635NM VAR HT
ASD3-25.000MHZ-ECT
OSCILLATOR 25.000 MHZ 1.8V SMD
5307H5-5V
LED T1-3/4 GREEN 656NM RA PCB
CUB7P220
COUNTER 8-DIGIT LOGIC RED
5307H3-5V
LED T1-3/4 AMBER 583NM RA PCB
CUB7P210
COUNTER 8-DIGIT LOGIC GREEN
5307H1-5V
LED T1-3/4 RED 635NM RA PCB
相关代理商/技术参数
CUB7P320
功能描述:COUNTER 8-DIGIT LV RED BACKLIGHT RoHS:是 类别:工业控制,仪表 >> 计数器 系列:CUB7 其它有关文件:Declaration of Conformity 标准包装:1 系列:99766 计数速率:25Hz 数字/字母数:5 输入类型:机电式脉冲 输出类型:- 电源电压:24V 显示器类型:十进制拨轮
CUB7T000
功能描述:TIMER LCD PROGRAM 8 DIGIT RoHS:是 类别:工业控制,仪表 >> 定时器 系列:CUB7 标准包装:10 系列:- 计时范围:- 工作模式:累积 输出类型:- 电源电压:4.5 V ~ 10 V 端接类型:PCB 引脚 显示器类型:无显示器 其它名称:2001PC-001 5VDCQ1273012Q1443992
CUB7T100
功能描述:TIMER LCD PROGRAM V IN 8 DIGIT RoHS:是 类别:工业控制,仪表 >> 定时器 系列:CUB7 标准包装:10 系列:- 计时范围:- 工作模式:累积 输出类型:- 电源电压:4.5 V ~ 10 V 端接类型:PCB 引脚 显示器类型:无显示器 其它名称:2001PC-001 5VDCQ1273012Q1443992
CUB7T120
制造商:Red Lion Controls 功能描述:ELECTRONIC TIMER VOLTAGE RED LCD
CUB7TCG0
功能描述:TIMER LCD PROGRAM 8-DIGIT LV GRN RoHS:是 类别:工业控制,仪表 >> 定时器 系列:CUB7 标准包装:10 系列:- 计时范围:- 工作模式:累积 输出类型:- 电源电压:4.5 V ~ 10 V 端接类型:PCB 引脚 显示器类型:无显示器 其它名称:2001PC-001 5VDCQ1273012Q1443992
CUB7TCG1
制造商:Red Lion Controls 功能描述:TIMER SOURCE GREEN DISPLAY 8-DIGIT 制造商:Red Lion Controls 功能描述:TIMER LCD GREEN DIS .001S-1H PAN
CUB7TCR0
功能描述:TIMER LCD PROGRAM 8-DIGIT LV RED RoHS:是 类别:工业控制,仪表 >> 定时器 系列:CUB7 标准包装:10 系列:- 计时范围:- 工作模式:累积 输出类型:- 电源电压:4.5 V ~ 10 V 端接类型:PCB 引脚 显示器类型:无显示器 其它名称:2001PC-001 5VDCQ1273012Q1443992
CUB7TCR1
制造商:Red Lion Controls 功能描述:TIMER SOURCE RED DISPLAY 8-DIGIT 制造商:Red Lion Controls 功能描述:TIMER LCD RED DISP .001S-1H PAN